When I first decided to start making bread I was on a quest for a recipe that was 100% whole wheat, used honey as the sweetener, and was soft even days after making it. I've always loved fresh made bread, but hated that if I stored it, it would be dry and crumbly two days later. I was determined that homemade bread existed that would stay soft and fresh for several days. And after much experimenting and recipe trying, I found it. The one. The only. Whole Wheat Bread recipe that I will ever make.
 I've included all my tips and tricks in the notes and pictures below. I hope I've made this process easy for you to make, because now that I've figured this out, I think it's as easy as 1-2-3. There is no going back!
So my post here today is to share with you all that I know in hopes that it will be that easy for you. I think it will be. If you have questions....please leave a comment, I will respond promptly! If you are new to the whole idea of bread making this should still be easy enough, I've explained everything in as much detail as I thought would be helpful.

{My Favorite} Whole Wheat Bread (see pics below for a quick tutorial)
Yield: 3 loaves
 Printable Version
*If you are new to bread making see notes below before beginning.
3 cups whole wheat flour (I use fresh ground whole white wheat)
¼ cup vital wheat gluten
2 tablespoons instant yeast (I use rapid rise -SAF brand)
2 ½ cups warm water
-----------------------------------------------------------------------
⅓ cup canola oil
⅓ cup honey
1 ½ tablespoons lemon juice
1 tablespoon salt
-----------------------------------------------------------------------
2 ½ - 4 cups whole white wheat flour
In a large mixing bowl (preferable Kitchen-aid or BOSCH mixer), add the 3 cups of flour, vital wheat gluten, and instant yeast. Mix until combined. Add in warm water and mix until smooth. Cover and let sit for 10 minutes.
After the above mixture has finished it’s 10 minute rest, add oil and mix. Next, add honey (in same measuring cup used for oil, so the honey will slide out nicely) and mix. Add salt and lemon juice and mix one more time to incorporate.
Finally, add the remaining flour. Add enough flour based on the texture of the dough. I usually add 2 ½ cups and mix for about 3 minutes, if the dough has pulled from the sides and is not sticking to the outer edges of the bowl, then that is plenty of flour. If it’s still sticky, I’ll add about 2 tablespoons of flour at a time until the dough has pulled away from the sides of the bowl and is all sticking together in around the kneading mixer. Continue kneading for 7 minutes (for a 10 minutes total knead time). Depending on the humidity and temperature of your environment will depend on how much flour you will need to add. The dough should have a somewhat tacky feeling, but if you push it around and try to form it it will hold it’s shape.
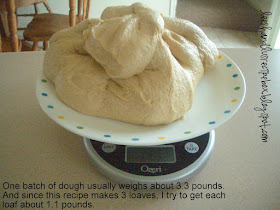
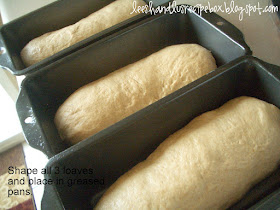
Spray your clean workspace with a light coat of spray grease, you can spray your hands a little too. This makes the dough so much easier to work with, and doesn’t add more flour by flouring the workspace. Place the dough from the bowl on the oiled surface. Divide into 3 even loaves (I like to weigh them). Press each section of dough into a disc shape that is evenly flat. Start rolling from one side and before you get to the middle fold in the edges and continue rolling to the other side. Pinch the dough closed on the seam and sides. Place in a greased loaf pan. Do the same with the other 2 loaves.
Cover loaves with a clean towel and let rise until 1 ½ to 2 inches above pan rim (30-60 minutes). Place pans in a cold oven, spaced evenly, and turn to 325 degrees and bake for 26-30 minutes or until done and golden brown.
When done, immediately pull out of oven and cool on a cooling rack until completely cool. If you leave it in the pan it will sweat and get soggy.
Recipe Source: adapted from cooks.com, and other bread making tips from Mel’s Kitchen Cafe
Notes:
- I use 8 ½ x 4 ½ size loaf pans, this seems to make the bread the perfect size for fitting a sandwich into a sandwich-size Ziploc bag.
- A flour measuring tip that I use (to produce tender bread that doesn't go dry in the cupboard) is to spoon the flour and lightly sprinkle it into the measuring cup, then level it off with a straight edge, such as a knife. If you scoop the flour and level it you often get more flour packed into the cup, and thus over-flour the dough. Over floured dough makes dry crumbly bread.
- This bread freezes well. If you don’t over flour the dough (see tip above about spooning flour), then you can pull a frozen loaf out of the freezer, let it thaw, and you’d never known that the bread wasn’t freshly baked.
- I always use whole white wheat. I grind it in a Nutrimill. You can also buy whole white wheat in many grocery stores (commonly found in a bulk foods section). I’ve used whole red wheat before, but it always produces dry bread for me. I like using red wheat in pancakes, waffles, etc.
- Yeast does make a difference. If you use instant yeast it will be a lot faster of a process for rising. If you use regular yeast, you’ll need to proof the yeast in ½ cup of the warm water and let it get bubbly for 3-5 minutes. I prefer instant yeast.
- If you are in a hurry and want your bread to rise faster turn the oven on for a few minutes and let it get a little bit warm, then turn the oven off and place the covered bread pans in the oven, this usually cuts the rising time in half.
I didn't include a picture for every single step in this tutorial. I've included the ones that seem crucial to making the perfect loaf of soft bread!
Some of the captions are harder to read than others, so I'll post the same thing above the picture.

 I added about 2 tablespoons of flour and kept kneading for 30 seconds, the dough is visually stiffer and is cleaning the sides of the bowl. This is what we want! Depending on the humidity & several other factors you may need to add up to 1 1/4 cups more than those first 2 tablespoons. I usually start by adding 2 tablespoons of flour at a time, & judge the dough by look. It should clean the sides of the bowl, but will still be tacky to the touch, but if you were to pinch off a piece you could form it into a ball.


Shape all 3 loaves and place in greased pans.


 *****NOTE*****This photo says turn oven to 350, but it's supposed to say 325.....sorry for the typo.


