Pages

Friday, July 29, 2011

Zucchini Brownies {with Creamy Milk Chocolate Frosting}


If you are thinking: 'zucchini with chocolate....is she out of her mind?!?!?!', well, just trust me. I hope after trying any of my other recipes that you do trust me. This recipe is a classic, it's a brownie recipe my mom made for us growing up. And if you are worried about green stuff with chocolate, don't be, you won't even know there is zucchini in them. The zucchini makes them moist and luscious! And to top it off they are frosted in a creamy, milk chocolatey frosting, which makes these brownies 'out of this world'. They are dreamy, really! Mmmmmmmmmmmm.

When you try them, let me know what you think!


Zucchini Brownies {with Creamy Milk Chocolate Frosting}
Printable Version
Yield: 1 9x13 size pan of brownies Ready in: 1 hour

2 cups all-purpose or whole wheat flour (or ½ of each)
1 ½ cups sugar (can reduce a little if you are counting calories)
1 teaspoon salt
1 ½ teaspoons baking soda
¼ cup cocoa powder
1 egg
¼ cup oil
2 teaspoons vanilla
3 cups grated zucchini (coarse or fine works great, I freeze zucchini in freezer bags in 3 cup increments - if you don’t have that much, you can use applesauce until you’ve reached 3 cups)
¼ cup chopped nuts (optional....pecans or walnuts are best)

Grease a 9 x 13 size cake pan. Preheat oven to 350 degrees.

In a medium size mixing bowl combine the following: flour, sugar, salt, baking soda, and cocoa powder. In another medium size mixing bowl combine the following: egg, oil, vanilla, and zucchini. Add dry ingredients to the wet ingredient mixture along with nuts if you’d like, and mix until combined (don’t over mix, just mix til it’s all moist).

Pour brownie mixture into greased pan and smooth with rubber spatula. If you don’t spread it all the way to the edges then it doesn’t tend to climb the sides of the pan. So just spread close to the edge and it will move over as it gets hot in the oven. This makes for prettier brownies that are more evenly shaped when cut into squares. Bake in preheated 350 degree oven for 45 minutes. Test with toothpick when finished, if it comes out clean then they are done. If not, bake a few more minutes and test again. Cool completely before frosting.

Creamy Milk Chocolate Frosting
¼ cup butter, melted
⅓ cup cocoa powder
2 cups powdered sugar
¼ cup milk (more if you want it thinner - add a teaspoon at a time)
dash of salt

Melt butter in a small mixing bowl (microwave safe), add cocoa powder and stir until smooth. Add powdered sugar, milk, and salt and stir until smooth.

Frost your brownies and enjoy!

Recipe Source: Diana K.

Wednesday, July 27, 2011

Stuffed French Toast

I love breakfast foods and could eat them for any meal of the day.  We eat "Brinner", as the hubs calls it, at least twice a month for dinner, sometimes more.  I love it for so many reasons.  It's cheap, it's fast, it's easy, and I usually have all the ingredients on hand.  I'm not sure I could pick just one favorite breakfast food, but if I had to, this would definitely be in the running.  It is so versatile and easy to fit to your tastes.  You don't have to make a separate meal for picky eaters, just stuff it with what they like.  I'm not really sure this is a recipe, but we love it so much I wanted to share it.  


Stuffed French Toast
1 loaf of french bread (Doesn't have to be fresh--day or two old is great too!)
2 eggs
1/2 cup milk
Butter (or coconut oil) for the pan
Your favorite toppings/stuffings (Some ideas include berries and cream cheese, peanut butter, nutella, nutella mixed with cream cheese, flavored cream cheese, leftover frosting...anything you can dream up.  As a side note, bananas don't work very well because they get mushy when hot.)

In half-inch increments, slice french bread making every other cut go all the way through.  This will leave you with 1-inch thick slices that have a nice pocket for stuffing.  Stuff each piece with, well, stuff. 

Preheat electric skillet to 325 or stove top griddle to medium-low heat.  In shallow dish, beat eggs with a fork.  Add milk and beat until combined.   (Some people like to add vanilla or salt and pepper or cinnamon to their milk and eggs.  I like mine unadulterated.)

Butter the hot skillet.  Dip each piece of stuffed french bread in the egg and milk mixture on each side.  Cook for about 4 minutes on each side or until golden brown and to your desired crispiness.  Serve immediately.  

Friday, July 22, 2011

French Bread

This is some of the yummiest stuff on earth. The final pieces of this bread are usually fought for at our house. I could seriously eat a whole loaf of this and call it a meal. This recipe comes from the bakery at Jacob Lake Inn, AZ--where both my mom and my sister, Lu, spent summers working. It is perfect for soaking up the extra sauce in spaghetti or lasagna. My favorite way to eat it is fresh out of the oven with a good slather of butter (real butter only though!--we can't stand the fake stuff around here). It makes great garlic bread, french bread pizzas, the best french toast, and even great bread crumbs--if by some crazy chance it stays around that long. I usually try to keep an extra loaf on hand in the freezer for french toast. Also, you can partially bake it and freeze it. Then when you are ready to eat it, pop it in the oven to brown it and you can have hot, freshly-baked bread--even on a crazy weeknight.


French Bread
2 1/2 cups warm water
2 tablespoons yeast
1/3 cup vegetable oil
3 tablespoons sugar
1 tablespoon salt
6 cups of flour (give or take a little)

In a large bowl or mixer, add yeast and sugar to warm water and let set for a few minutes. When the yeast mixture is happy and bubbly, add the oil and salt. Add 3 cups of the flour and mix for a few minutes. Add remaining flour until dough pulls away from the sides of the mixing bowl. Knead for 3 minutes (or 6 by hand). Let dough rise for 30 minutes.

After dough has risen, punch it down and split dough in half. Roll each half into a 9x12 rectangle. Tightly roll up each loaf (from the longer side) and pinch and seal the seam shut (to form two 12 inch loaves). Place loaves seam side down on a lightly greased or silicone-lined baking sheet. Lightly cover with a kitchen towel and allow to rise for 30 minutes.

Preheat oven to 400. After the dough has risen, using a very sharp knife make slashes across the top of the loaf. Lightly spray loaves with water (or brush with an egg wash if you like your crust crustier). Bake for 25-30 minutes or until golden brown.

*Make ahead instructions: Prepare as directed above except bake at 300 for 40-45 minutes. Freeze. When ready to eat, allow to thaw and bake at 400 until brown (about 8 minutes).

Recipe Source: Jacob Lake Inn Bakery with adaptations by Diana K.

Wednesday, July 20, 2011

Potato Salad

I've lost track of how many times I've made this potato salad in the last month. It's been a big hit at lots of family and friend get together's. I also must admit that I am a potato-salad-snob. I absolutely will not touch a store bough potato salad. And I usually won't touch a homemade potato salad unless I know who has made it. I know I like my mom's recipe, my grandma's recipe, and most recently my sister-in-law, Marcie's, recipe. I'm just not daring enough to try any others.

Marcie's recipe is my favorite of all the potato salad's I've tried. Marcie and I have a lot of similar tastes when it comes to food, and several of them are present in this yummy potato salad. First and foremost, Miracle Whip is a big-FAT-no-no in our book. It's too over powering and that's all we taste when it is present. So this recipe has, Mayo. To us mayo is mild and helps bring out the flavors in the food that you want to taste. Another thing is we love olives! Olives are so good in a potato salad, and I am not sure I'd ever had them in one until I tried Marcie's recipe. Sooo good, and it adds another color. One last thing is pickles. We are persnickety about the kind and brand. Vlasic Kosher Dills are really the only way to go if you ask us. But as long as they are kosher dill, they should keep us happy. Kosher dills are crunchy and have the best (in our opinion) flavor out there when it comes to pickles. Well now you know a little bit more about my picky-ness.

Anywho, enough of my ramblings about flavors and and preferences. I hope you enjoy this salad. It's the perfect side dish at any summer BBQ.


Potato Salad

Printable Version

Salad:
4 large or 6 medium potatoes, peeled, diced (about 7-8 cups raw potato cubes)
1 large can olives, sliced or 2 cans pre-sliced
4-6 large dill pickles, finely diced (about 2 cups)
2-4 celery ribs, finely diced
Green oinion, chopped, as much as you like (about 2/3 cup is what I like)
8 hard-boiled eggs, diced

Dressing:
1 1/2 cups mayo
1/8 cup yellow mustard
1 teaspoon celery salt
1/2 teaspoon black pepper, fresh ground

Hard boil 8 eggs and dice, place in large mixing bowl. Cook diced potaotes in simmering water for about 15-20 minutes until tender, drain and set in a large mixing bowl with eggs. Add all other salad ingredients to large mixing bowl (olives, pickles, celery, green onions).

In a small bowl mix together mayo, mustard, celery salt and pepper until combined. Pour over salad mixture and mix until coated. If you really like a lot of dressing, add an extra cup of mayo and double the rest of the dressing ingredients. I like mine lightly dressed, and the amounts listed above seem to be perfect.

Chill until cold throughout and serve.

*Can be made gluten-free, make sure mayo is gluten-free

Recipe Source: Marcie G.

Wednesday, July 13, 2011

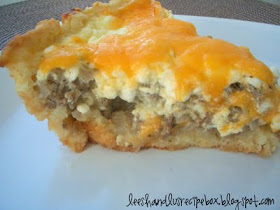
Beef & Cheese Wedges

Do any of you like the movie 'Elf'? I think it's pretty hilarious. I watch it every Christmas season. There are too many funny parts. I really love when Buddy tries to put the star on the tree and he jumps off the couch and leaps for the tree. It's really fun to watch that in slow- motion. But one line in this movie that I especially love is when Buddy is at the mall preparing for Santa to arrive. When he sees that Santa is not really Santa, he says, something like ....."You don't smell like Santa, you smell like beef and cheese." When I make these yummy beef and cheese wedges I always think of that line! Although you may not want to smell like beef and cheese, you'll love the taste of it. That is a promise!

This recipe comes from my mother-in-law. When Steven and I got married, I asked my mother-in-law for all the recipes she made that Steven loves. This is one of them, and now after making it several times since we've been married I know why he loves it!

It comes together pretty quick. I've learned a few helpful tips that I'll share in the recipe (below) that have sped up the process of putting it together. The flavors are mouthwatering, it has the perfect seasonings, a yummy, fluffy biscuit-like crust, and topped with cottage cheese and cheddar cheese, it's just simply, 'to die for'. Hope you'll enjoy!

Beef & Cheese Wedges

Printable Version

Crust:
1 egg yolk, beaten (you'll use the white in the topping)
1 cup biscuit mix (I make my own, see below for recipe, or you can use Bisquick, Jiffy or other baking mix)
3 tablespoons milk

Meat Filling:
1-1.5 pounds ground beef (extra lean)
1/2 cup yellow onion, chopped
1/2 teaspoon salt
1/2 teaspoon Italian seasoning
1/4 teaspoon pepper, fresh ground
1 clove garlic, minced

Topping:
1 egg + 1 egg white (should have one that you didn't use in the crust), beaten
2 cups cottage cheese (1 16-oz package)
1/2 cup cheddar cheese, shredded

Stir together egg yolk, biscuit mix, and milk. Form into a pie crust about 1/8 inch thick, and place into a 9 inch pie dish. The easiest way to make this into a crust is to grease with spray grease two sheets of plastic wrap. Place the ball of dough onto one of the greased sides of plastic wrap and place the other sheet greased side down, on top of the dough. Press it into a circle and with a rolling pin, roll it into a big circle, big enough to place in your pie dish.

Preheat oven to 375 degrees. In a skillet over medium-low heat cook beef, along with onion, salt, pepper, Italian seasoning and garlic. Cook until beef is browned and fully cooked. If there is an excess amount of grease drain in colander. When meat is cooked and drained pour it into the pie crust.

In a small bowl coming egg/egg white and cottage cheese, mix well. Pour this mixture over the meat mixture.

Bake in preheated 375 degree oven for 15-20 minutes, top with shredded cheddar cheese and bake 10 minutes. Let set for 10-15 minutes before serving. Cut into wedges and serve.

Recipe Source: Maureen G.

Homemade Biscuit Mix: (adapted from Better Homes and Garden Biscuit Recipe)

3 cups all-purpose flour
1 tablespoon baking powder
1 tablespoon sugar

1 teaspoon salt
3/4 teaspoon cream of tartar

Mix together and store in airtight container. I also use this same biscuit mix in my recipe for 'Crustless Blender Quiche'.

Monday, July 11, 2011

Indoor S'mores

There seems to be a lot of s'more love going on in the blog world lately.  Maybe because it's Summer.  Maybe because they're delicious.  Either way you should join the fun if you haven't already.  These are the perfect summertime treat because you won't have to turn your oven on.  Plus, who doesn't love graham crackers, chocolate, and marshmallows? I do.  And so does Lu.  


As kids we would fight over who got to read which cereal boxes at breakfast.  Have you noticed that some cereal boxes never change?  I mean, you can only find the message in the cinnamon swirls so many times before you know it by heart.  In fact, I think King Vitaman has the same knight and castle on the back of the box as they did when I was a kid.  Anyway, on the side of the Golden Grahams box for practically my whole childhood they had this recipe.  We (my mom) finally tried it with about the 367th box and I'm sure glad we did because we've probably had it about 367 times since. 


Indoor S'mores  
Printable version 


8 cups Golden Grahams® cereal
5 cups miniature marshmallows
1 1/2 cups chocolate chips (I like semisweet best, but use whatever you like)
1/4 cup light corn syrup
5 tablespoons butter
1 teaspoon vanilla
1 cup miniature marshmallows, if desired


  1. Into large bowl, measure cereal. Butter 13x9-inch pan. In large microwavable bowl, microwave 5 cups marshmallows, the chocolate chips, corn syrup and butter uncovered on High 2 minutes to 3 minutes, stirring after every minute, until melted and smooth when stirred. Stir in vanilla
  2. Pour over cereal; quickly toss until completely coated. Stir in 1 cup marshmallows.
  3. Press mixture evenly in pan, using buttered back of spoon (or your clean hand). Let stand uncovered at least 1 hour, or refrigerate if you prefer a firmer bar. Store loosely covered at room temperature up to 2 days.
  4. You can also spread it out on wax paper and allow to set up instead of making it into bars if you want yummy s'more pieces.
  5. Recipe Source: Golden Grahams® Box  


Wednesday, July 6, 2011

Curried Chicken Salad

I'm always in need of a yummy summer salad. This salad is great for picnics, family parties, or just for a non-oven summer meal. I love all the flavors that this salad has to offer. The grapes are especially good. I have a thing for a sweet taste in a salad or on a sandwich. I actually doubled the grapes in this recipe cause they are just that good.

We made this while my sister was staying at our house and she said, "I've never had cold rice before, it's really good." This salad has rice in it and it's so yummy. I also love the diced celery, it adds the perfect crunchiness. Oh and the peanuts.....wow, this salad is full of the best flavors and they all go so well together.

I use a yellow curry in this recipe. It's McCormick brand, it's not hot/spicy. It's mild and gives the dressing the perfect flavor. I hope you love this as much as we do.

Curried Chicken Salad

Makes 8-10 servings

Printable Version - with picture
Printable Version - text only

Salad:
4 cups chicken, cooked and cubed
1 cup dry roasted peanuts
2 cups celery, diced
2 + cups red seedless grapes, halved
¼ cup yellow onion, finely chopped
2 cups cooked rice (optional, but recommended)

Dressing:
½ cup mayonnaise
1 tablespoon lemon juice
⅛ teaspoon ground pepper
¼ teaspoon salt
¾ teaspoon curry powder (yellow)

Note about the dressing: The original recipe calls for double the amounts of the dressing ingredients, but I though it was way too much, so if you like a lot of dressing double the above amounts.

In a large mixing bowl, combine chicken, peanuts, celery, grapes, onion, and rice. Mix well.

In a small mixing bowl combine mayonnaise, lemon juice, pepper, salt, and curry, mix until combined. Stir the dressing into the chicken mixture until it is all coated.

Pour salad into a serving bowl and cover with plastic wrap, chill until ready to serve. This salad is best if you can chill it for a few hours to overnight.

Notes:

If I don’t have any pre-cooked chicken I usually boil a few breasts or tenderloins until they are cooked through and then cut them up with scissors into bite size pieces.

If you leave out the rice then you will want to cut the amount of dressing back.

I usually plan this meal when I have another dish with rice on my menu on a preceding day. Then I just cook extra rice and refrigerate it until I am ready to make the salad. It makes for less work that day, which is always nice.

If you want gluten free, make sure mayo is gluten-free.

Recipe Source: slightly adapted from Maureen G.

Monday, July 4, 2011

Cheesesteak Subs

These subs have appeared (not magically, of course) on our dinner table at LEAST twice a month (maybe more) since I've discovered their yumminess and simpleness. The original recipe calls for provolone cheese, which we love. But we've also made them with a spicy pepper jack and they were to-die-for. Either cheese is pleasing to my taste buds. What way will you make them?

These subs are made best with homemade sub rolls, which I posted a recipe for last week. I'm sure they'd be good on a store bought bun, but they will really knock your socks off if you have them on these homemade subs. Really, try them! They are soft and tender and when they are toasted to perfection (like this recipe calls for) it gives them the perfect crunch. I mentioned last week that I usually make a double batch of the rolls. I make some into rolls and some into subs. They freeze great and then I can have a quick tasty meal in minutes!

Cheesesteak Subs

Printable Version - with picture
Printable Version - text only

Makes about 4 sub-sandwiches

2 tablespoons butter
1 onion, halved and sliced into thin half moons
2 garlic cloves, minced
¼ teaspoon oregano
2 tablespoons A-1 steak sauce
1 pound deli roast beef, cut into 2-inch strips
Salt and pepper to taste (optional)
4 (6-inch) sub rolls, sliced open lengthwise
8 slices provolone or pepper-jack cheese

Preheat the broiler in your oven and adjust a rack to the upper-middle position.

Meanwhile, in a large skillet, melt the butter over medium-low heat. Add the onion and cook until soft and golden, about 8 minutes. Stir in the garlic and oregano and cook for a minute, until it smells fragrant, be careful to not have the heat to high or your garlic will burn. Add the A-1 steak sauce and the sliced roast beef. Stir well to coat the beef with the sauce and onion/butter mixture. Cook until the meat is heated through, about 2 minutes. Season with salt and pepper to taste (this is optional - and I have to admit I’ve never done it).

Place the sliced rolls on a baking sheet. Place an even amount of beef on each roll. Place sliced cheese on top of the meat. With the buns open, place in the oven on broil and broil until the cheese is melted, about 2 minutes - but don’t go far and check on them before 2 minutes. You don’t want them to burn. They are best when the cheese is melted and the top side of the sub roll is nice and toasted. Serve immediately.

Recipe Source: Mel’s Kitchen Cafe - www.melskitchencafe.com

Friday, July 1, 2011

Tres Leches Cake

If you've never had tres leches cake before, you must try it.  My hubby requested it for his birthday cake this year.  I made the cake but hadn't frosted it yet and had it chilling in the fridge while we were eating dinner.  We were going to have some friends over for a little birthday party, but had some tornado warnings for our area so no one really wanted to go out.  This was just shortly after the most deadly tornado in the last 60 years in the US hit Joplin, which is less than a two hour drive from here.  Never having lived in a place with real tornado threats I was freaking out just a tad.  We live on the second floor in an apartment building, so we decided to go to our neighbors' house down the street where we would at least be on the ground if a tornado did touch down in our area.  So, we got the car loaded up with our 72 hour kits and started heading over to our neighbors'.  My husband insisted that we go back in and get the cake and bring the whipping cream with us.  I went back--but only because it was his birthday.  I really couldn't believe he was serious, but I guess this cake is that good. 


Tres Leches Cake
FOR THE CAKE:
1 cup All-purpose Flour
1-1/2 teaspoon Baking Powder
1/4 teaspoon Salt
5 whole Eggs
1 cup Sugar, Divided
1 teaspoon Vanilla
1/3 cup Milk

FOR THE TOPPING:
1 can Evaporated Milk
1 can Sweetened, Condensed Milk
1/4 cup Heavy Cream

FOR THE ICING:
1 pint Heavy Cream, For Whipping
3 Tablespoons Sugar
1/2 teaspoon vanilla

Preheat oven to 350 degrees. Spray a 9 x 13 inch pan liberally until coated.

Combine flour, baking powder, and salt in a large bowl. Separate eggs.

Beat egg yolks with 3/4 cup sugar on high speed until yolks are pale yellow. Stir in milk and vanilla. Pour egg yolk mixture over the flour mixture and stir very gently until combined.  

Beat egg whites on high speed until soft peaks form. With the mixer on, pour in remaining 1/4 cup sugar and beat until egg whites are stiff but not dry.

Fold egg white mixture into the batter very gently until just combined. Pour into prepared pan and spread to even out the surface.

Bake for 30 to 35 minutes or until a toothpick comes out clean. Allow cake to cool.  (You can remove the cake to a rimmed platter, but I prefer not to because I think the edges stay moister if you top it while it is in the pan, it’s just not as pretty to serve it out of the pan.)

To make the topping, combine condensed milk, evaporated milk, and heavy cream in a small pitcher. When cake is cool, pierce the surface with a fork several times paying special attention to the edges so they aren't dry. Slowly drizzle the milk mixture over the cake, again giving the edges special treatment.
Cover cake and refrigerate for 2+ hours. To make the icing whip one pint of heavy whipping cream with 3 tablespoons of sugar and ½ teaspoon of vanilla.  Ice just before serving.  
Recipe Source: Adapted slightly from the Pioneer Woman as influenced by Alton Brown