You'd also be surprised by how easy and fast these are to make! Don't be scared - you'll impress your family and yourself! (See below the recipe for step-by-step pictures on how to make these cookies - or print the step-by-step PDF)

Fortune Cookies
Yield: 10-12 cookies
Ingredients:
1-2 egg whites
1/8 teaspoon vanilla
pinch of salt
1/4 cup all-purpose flour
1/4 cup white sugar
Directions:
Write fortunes (or love notes) on strips of paper (no longer than 4 inches, and 1/2 inch tall or less). Fold the strips of paper up. Preheat oven to 400 degrees. Generously grease 2 cookies sheets or use a silicone baking mat (this is what I use).
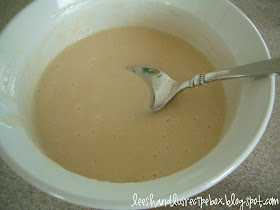
In a small mixing bowl whisk vanilla and one egg white together until foamy but not stiff. Add flour, sugar, and salt to mixture and mix until smooth. It should fairly runny. If it's not then add another 1/2 to 1 whisked egg white (see picture below of the consistency of the mixture).
Spoon a teaspoon full of batter onto the greased or silicone lined baking sheet and using a spoon bottom, smooth the batter out into a 3 inch circle. Only do 2-3 to start and then see how fast you can do them. They cool fast and it's hard to work with unless they are still nice and hot. Make sure you place them at least 4 inches apart from each other so they won't touch each other while baking.
Bake for 5 minutes or until the cookie has tuned a nice golden brown about 1/2 inch wide around the outer edge of the cookie. The center of the cookie will remain a pale color. While one sheet is baking you can prepare the next sheet with more batter.
Remove the pan from the oven and quickly turn one cookie over with a stiff, wide spatula (place on a cutting board if you are using a greased cookie sheet, if you use the silicone liner you can just turn it over on the pan). Quickly place the folded fortune/love note in the center of the cookie, fold the circle-shaped cookie in half - and place the fold of the cookie on the edge of a bowl and pull the pointed edges down, inside of the bowl and one on the outside of the bowl. Put the folded cookie into a muffin tin to help it hold it's shape until cooled. Repeat this process with the other baked cookies before they cool. If you can handle doing 2-3 before the cool you could try baking 4-5 on the next sheet. They don't bend very easily if they cool off too much, so just be warned.
Once the cookies are cooled and set out for 15-30 minutes they will be crunchy and ready for serving.
Recipe Source:
slightly adapted from allrecipes.com
Write fortunes/love notes on strips of paper
(no longer than 4 inches, and 1/2 inch tall or less)
(no longer than 4 inches, and 1/2 inch tall or less)

Fold the papers up so they are ready for putting in the cookies
(this is important cause you won't have time to fold them before you fold the cookie)
(this is important cause you won't have time to fold them before you fold the cookie)
Whisk one egg white and vanilla until foamy

Mix until smooth
If it's too thick add another 1/2 - 1 egg white (that has been whisked to foam)
It should be runny but fairly thick

Place teaspoon fulls of batter onto generously greased or silicone lined baking sheet
Smooth the batter with the bottom of a spoon into a 3 inch circle
placing each cookie at least 4 inches from the others
Start with only making 2-3 to see if you can do them fast enough

Bake for about 5 minutes
or until the cookies are golden brown
about 1/2 inch wide around the outer edge of the cookie

With a stiff, wide spatula turn the cookie over

Here the bottom side of the cookie is shown

Place one folded fortune/love note in the center of the cookie

Fold the cookie in half

Place the fold of the cookie on the edge of a bowl and pull the pointed edges down,
one on the inside of the bowl and one on the outside of the bowl.

Place the folded cookie in a muffin tin to hold it's shape while it cools.
Once cool it will be hard and crunchy.

Repeat the process with the other cookies, making sure to move fast,
as they cool they are hard to shape. If you could handle doing 2-3,
try doing 4-5 (but don't do more than that at once)

Here they are! All cute and yummy!
They will knock your socks off as to how good they are,
the ones at restaurants taste like cardboard compared to these babies.
 FYI:
FYI:
Some recipes call for doing this in a greased non-stick skillet,
but they don't turn out as pretty as you can see from the following 2 pictures.
But they still do taste just as good.


Well...I'm impressed. Those are beautiful.
ReplyDeleteThey ARE beautiful. I made these yesterday. I have only made them on a skillet before and the oven method was WAY easier!
ReplyDelete